
Course Mapping

Maps are all around us: on our phones, in our cars, in public spaces—just about anywhere. We use them to navigate traffic, go on road trips, illustrate concepts; put simply, they show us the way from Point A to Point B. By illustrating roads, traffic, and terrain, maps display how to get somewhere and what might happen along the way. Essentially, maps provide a high-level overview of new or unfamiliar territory, allowing us to journey safely and efficiently.
Designing an online course can also present unfamiliar territory. If you’re creating one, you probably know where you want students to end up, but you might not know how you’ll get them there, what tools are available to you, or even how you’ll engage them. This is where course maps come into play. Just as traditional maps identify a path through unfamiliar terrain, course maps illustrate the alignment between a course’s learning objectives, instructional material, and assessments. In this article, we’ll cover what a course map is, how a course map can benefit your course, and how course maps can be built.
What Is a Course Map?
Simply put, a course map is an outline of your course. You may have heard this referred to as curriculum alignment or something similar, but, whatever the case, a course map identifies each of your learning objectives, the assessments that you’ll use to prove that students understand the content, and the instructional materials that students will use to prepare for those assessments. By putting these elements side by side, a course map illustrates what students will do, consume, and accomplish throughout your online course.
The Benefits of Course Maps
As you might imagine, creating an outline of your primary course elements can be a long and arduous task. Despite this, a course map serves several roles that impact your course in diverse and powerful ways. With this in mind, let’s look at how a course map might benefit you and your online course.
Assisting With Project Management
Because a course map outlines your course elements, it can serve as an important tool for organizing your course design project. It can be used to outline what course elements need to be written, found, or otherwise created, making it a checklist of sorts to determine what needs to be done before you begin building the course in your learning management system. Similarly, it can be used to help determine a modular structure for your online course. This structure doesn’t have to be part of the map itself, but it can help you determine which course elements could be sequenced or placed alongside one another, helping you determine the order in which you’ll tackle developing them.
Compensating for Expert Blind Spot
Course maps also help you identify and address expert blind spot. This refers to the fact that instructors and course writers typically understand the relationship between course content and the skills required for success in the course, while students might not. This is an important consideration when course mapping because while you, the expert, might see everything as clear and interconnected, students, as novices, might not. To address this, Ambrose et al. (2010) suggest you ask, “What would students have to know—or know how to do—in order to achieve what I am asking of them?” (p. 113). Fortunately, a course map can help you begin to address this. By identifying and organizing the course’s learning objectives and aligning those objectives with assessments and instructional material, a course map illustrates the steps students will take to ultimately achieve mastery. With this in hand, you’ll more easily be able to identify any spots where students might need to know or have something to aid them in achieving what you’re asking of them.
Additionally, because the course mapping process makes you illustrate the alignment between your course elements, it helps you address another aspect of expert blind spot: time. Because you’re well versed in your field, it’s easy to forget that the concepts you want students to learn can take longer to master. By evaluating your objectives, breaking them down, and aligning them with instruction and assessments, however, you can establish a clearer idea of what a novice will have to do to develop mastery of each component of your course.
Determining Appropriate Revisions
Lastly, a course map can prove helpful when it comes to enhancing your course. Because it provides a bird’s-eye view of your objectives, assessments, and instruction, it can be used to help identify areas where you might need to provide additional support, remove scaffolding, or make other types of typical enhancements or revisions. Depending on the format of your course map, you can move course elements around or restructure them to see if they’d work better elsewhere, or in a different sequence.
As we’ll discuss later, one of the most valuable uses of a course map is that it can be used to ensure that you’ve adequately defined the component skills necessary for students to master your objectives. Course design isn’t a one-and-done process; it’s something that requires constant review and revision. Ambrose et al. (2010) note that “many successful, experienced instructors maintain that it takes at the very least three years of progressive refinement to build an effective course” (p. 220). Reviewing your objectives is a critical part of the course revision process, and your course map can provide you with the sort of high-level overview you can use to add any skills (or objectives) that might need to be addressed. It also allows you to make sure every objective is assessed, and that you have included the course elements necessary for students to meet those objectives. Simply put, your course map provides you with an overview that will allow you to progressively refine your ideas and eventually design an effective course.
Backward Design

We’ve mentioned that learning objectives, assessments, and instruction are critical to the development and completion of a course map, but it can sometimes be difficult to organize or conceptualize what those elements should look like or where you should start. While you can start anywhere, really—a brainstorming document, an empty table or mind map, or even a list of objectives provided by your institution—one popular and well-respected method for planning a learning experience is backward design.
Developed by Wiggins and McTighe (1998), the process of backward design suggests that when you’re developing a course you should start at the end—that is, what students should be able to do by the time they complete the course. This approach, which is widely accepted as one of the more reputable models of instructional design, breaks course development into three steps:
- Identify desired results: What should students know or be able to do by the end of your course?
- Determine acceptable evidence: How will you know if students have achieved the desired results, and what will you accept as evidence of student understanding and proficiency?
- Plan learning experiences and instruction: What course elements will students read, view, or otherwise engage in to learn and prepare to demonstrate their mastery?
Ultimately, backward design is respected as much as it is because it helps ensure alignment between course elements. By starting with the course’s end goals in mind, a developer is able to ensure that the objectives and instruction are aligned with the course’s goals. Additionally, backward design focuses on student accomplishment—that is, the output of the course—instead of on what the teacher wants to cover, the structure mirrored by a textbook, or a trendy assessment.
The Course Mapping Process
We’ve spent a lot of time discussing things related to course maps—what they’re made of, how they’re helpful, and how you can start planning one—but how do you go about building one? There are a number of different tools you can use to outline and display your map, but we typically recommend using a table in something like an Excel spreadsheet or a Word document. While the process of playing with rows and cells can be cumbersome, the finished product can illustrate one of the primary purposes of a course map: alignment. Learning objectives, assessments, and instructional material are all critical elements of any instructional endeavor, but these elements must work together to maximize their potential. Instruction should help students master learning objectives, and assessments should measure students’ progress toward (and eventual mastery of) those objectives. When you align your objectives, assessments, and instruction in your course map, you build a structure that supports student learning and avoids the inclusion of any unnecessary content or student work.
With these things in mind, let’s look at how to build the course map itself.
Step 1: Articulate Your Learning Objectives

As suggested above, backward design begins with looking at what students should know or be able to do by the end of your course—that is, your learning objectives. Learning objectives are the cornerstone of your online course. When articulating learning objectives, it might be helpful to look at them in terms of “macro-objectives” and “micro-objectives.” Macro-objectives are typically the big picture items that identify what students will be able to do by the end of the course—what you might think of as “traditional” learning objectives. Micro-objectives, on the other hand, are the skills students will need to master to accomplish the macro-objectives. This distinction helps you ensure that students either have or will learn the component skills necessary for success.
For instance, a macro-objective from an education course might be, “By the end of this course, students will articulate a classroom management plan.” But what do students need to know to make such a plan? This is where micro-objectives come into play. Micro-objectives are the skills and knowledge students will need to learn to be able to articulate a classroom management plan. Think of them as the things students have to be able to do to perform the macro-objective. For our classroom management plan example, the corresponding micro-objectives could be something like:
- Define classroom management.
- List the components of a classroom management plan.
- Compare and contrast styles of classroom management.
- Critique an instructor’s classroom management strategy.
Students can’t articulate a classroom management plan if they don’t know what it is or what its components are. Similarly, they can’t really articulate a plan of their own unless they’ve seen one implemented. If the macro-objective is the destination, the micro-objectives form the path students will take to get there. Simply put, macro- and micro-objectives guide every other decision in the development of the course.
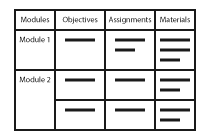
When creating the course map itself, we recommend starting with your macro-objectives in the leftmost column of your table. By doing so, you lay a foundation off which you can start expounding on those macro-objectives, eventually illustrating how the corresponding elements in your course map align with them. To the right of those macro-objectives should be each one’s micro-objectives. Because the micro-objectives illustrate the things students will do or learn as they work toward mastery of the macro-objectives, it’s important to keep them aligned; that way, as you continue to build out your map, you can see how each successive step builds off the previous one.
For an example of what a course map looks like at this stage, feel free to download our example:
Step 2: Describe Your Assessments

Once your learning objectives have been determined, the next step is to describe how students will prove their progress along the way. This is where assessments come into play. For each macro- and micro-objective you identify, you should also identify an assessment to show that you have a plan in place to show how students have mastered that objective.
Once you have a measurable, student-centered objective, it should be straightforward to come up with a corresponding assessment. While you don’t have to progress through course development in this manner, this approach can prove helpful in establishing clarity and alignment. Consider our education example:
“By the end of this course, students will articulate a classroom management plan.”
Because we started with a measurable, action-oriented objective, we have a clear idea of how students can demonstrate their achievement of it. In this case, students could write out their classroom management plan, prepare a presentation on it, or even create an online portfolio—basically any activity that allows students to prove that they can truly articulate a classroom management plan.
Typically, online courses include two types of assessment: formative and summative. Formative assessments monitor student learning—think along the lines of self-checks or rough drafts. These are oftentimes low-stakes activities that allow students to practice the skills they’re looking to master. Summative assessments, on the other hand, evaluate learning at a benchmark (e.g., the end of a module or course) and normally have higher stakes—think final exams, essays, and so on.
When adding assessments to your course map, we recommend creating two additional columns to the right of your objectives: one for formative assessments, and one for summative assessments. Then, next to each macro- and micro-objective you’ve articulated, describe the assessment that will measure it. This isn’t a hard rule, but summative assessments typically align to macro-objectives, and formative assessments typically align to micro-objectives.
For a look at how this might work out in an actual course map, feel free to download our next example, which builds off the objectives provided in the first:
Step 3: Identify Your Instructional Material

The final step focuses on the instruction itself. Now that the course’s goals have been developed and acceptable evidence has been determined, you can figure out the readings, videos, and other elements in your course that prepare students for their assessments. As you create or choose these materials, it’s important to make sure they align with your objectives and assessments. Using a resource that doesn’t help students meet a learning objective is sort of like using an outdated map; you can see the destination, but you’ve been given the wrong directions to get there. This situation would frustrate most travelers, and the effect is the same for students. They know what they should be able to do, but what they’ve been given doesn’t show them how to do it.
Fittingly, instructional materials are the last piece you’ll add to your course map. To do so, we’ll continue with what we’ve done for the other elements: Add columns to the right of your existing aligned objectives and assessments. When adding these materials, consider adding columns for things like type or title, too. These can prove helpful for showing things like the diversity of your materials, or the amount of work students are being asked to complete.
If you’re interested, our final example course map illustrates how instructional materials can be shown alongside existing objectives and assessments:
The Challenges of Course Mapping

Because course mapping asks you to look at your entire course—what students will read, what they’ll do, and even how they’ll interact with one another—there are a lot of moving pieces, which can make it easy to get lost in the weeds. With that in mind, consider some common struggles that accompany course mapping.
Challenges With Backward Design
Backward design is a powerful and well-respected development model for ensuring alignment between course elements. That being said, the model isn’t perfect. You might not always be familiar with the students or institution, which can be critical for determining end goals (and thus, the rest of the model). Similarly, backward design leaves little room for improvisation in the instance that something unexpected arises in a course, and it doesn’t always consider the diverse needs of students that may become apparent after you begin teaching.
Additionally, backward design is a pretty specific process: You identify your learning objectives, figure out how you’re going to assess them, and select or create the instructional materials that will prepare students for those assessments. While there are a wealth of benefits to this process, there will be situations where, because of any number of factors, you might not choose to start with that end in mind. Maybe it’s a case where, because of your history teaching this course, you have a piece of instructional material selected. Or, because of your experience in your industry, you come into the course mapping process with a particular assessment in mind. Just because these situations don’t follow backward design specifically doesn’t mean that they’re not instructionally sound, however. Whatever route you take to create your course map, what’s ultimately important is that your learning objectives, assessments, and instruction align.
Challenges With Course Elements
As we’ve discussed, a course map provides stakeholders with a bird’s-eye view of your course. It outlines your objectives, assessments, and instruction in such a way that someone viewing it will understand what students will do by the end of the course and how they’ll get there. Because of this, it’s easy to fall into the trap of thinking that you must have every individual element lined up while you’re mapping out your course. However, this isn’t the case. While it’s a good idea to plug in individual items as you find or develop them, in the early stages of course mapping, this isn’t necessarily critical. So, if you’re too far out in the development process to know what specific instructional material you’ll use, just describe what you’d like to use to the best of your ability. In addition to providing an early look at the instructional alignment, this will also help you start to develop an idea of what exactly you’re looking for as you select or write your instructional materials.
Similarly, you might not know exactly how you want to assess your students. As we discussed earlier, one starting place for this can be the assessment’s corresponding learning objective. Looking at what you want students to be able to do might just help you figure out how you want them to demonstrate that learning. For instance, if your learning objective states that, “By the end of this course, students will be able to construct a classroom management plan,” the corresponding assessment could be just that: asking them to construct a classroom management plan. While this might not always work so smoothly (for instance, a classroom management plan might be scaffolded across multiple objectives), it can at least provide you with a starting point.
Lastly, if you haven’t received learning objectives, it can be challenging to figure out where to start. While backward design can help immensely with this, don’t hesitate to reach out to colleagues, determine where your course fits into its program or sequence, and go from there. Similarly, it’s sometimes helpful to create a brainstorming document—even a simple list—to begin jotting down ideas about what students should be able to accomplish and how you’ll get them there. Remember—the process isn’t as important as the final, aligned product.
Challenges With Course Context
Your course won’t be limited to the objectives, assessments, and instruction you come up with; it is situated in a broader context: who the students are, how many of them are enrolled, how many credit hours the course is worth, where the course falls in the program, and so on. While these elements don’t appear in the course map itself, they play an important role in determining what goes into that map. For instance, if your course is worth three credit hours and your course map accounts for five credit hours’ worth of work, you’ll have to revise it. Similarly, you might want to measure an objective using an elaborate authentic assessment, but that might not be feasible if enrollment for the course is typically capped at 40 or 50 students, meaning you have to opt for an automatically scored assessment instead. This isn’t to suggest that course context has to dictate what you include in your course map (and, eventually, your course). Rather, it’s important to keep what you know of this context in mind while you develop so that you can plan realistically.
Challenges With Technical or Logistical Issues
Lastly, the technical and logistical issues of creating a course map can be frustrating. If you’re using a table in Microsoft Word, you might have to deal with merging cells or copying and pasting a course element into multiple cells. However you create your map, do so in a way that’s conducive to how you can best visualize and represent the alignment between your objectives, assessments, and instruction. If this involves merging tables, great. If it involves copying and pasting information in cells repeatedly, that’s also okay. What’s important is that your course elements are displayed in a way that illustrates the alignment to anyone who might be looking at your map.
Additionally, when it comes to the logistics of planning your course, it can be tempting to include elements such as course introductions, modules announcements, and so on. While these are important components of your final course, they do not have to be included in the course map. Remember—the map itself is a representation of the alignment between your objectives, assessments, and instructional materials. While these “unaligned” elements will be affected by those items, they don’t necessarily have to be included in the map itself.
Conclusion
The value of a course map can’t be overstated. By creating a bird’s-eye view of what students will be able to do by the end of your course and how they’ll get there, you set the stage for what will eventually become your modules, your interactions with students, and more. This can be a nuanced, time-consuming, and even frustrating process, but it’s one that can pay major dividends when it comes to course development.
Whatever form your course map takes or however long it takes you to create it, remember to ensure that it’s aligned, measurable, diverse, and organized. By doing so, you begin ensuring that you’ll be able to create a course that meets your own needs, those of your institution, and, most importantly, those of your students. Similarly, it can be helpful to note that a course map is a living document; that is, it will evolve as the course is being developed, and it will certainly evolve if you teach the course and decide on revisions or enhancements. Whatever the case, it’s important that your course map remains up-to-date to reflect the current iteration of the course.
With those things in mind, here are a few of the key takeaways from this article:
- A course map outlines how the objectives, assessments, and instruction in your course will align. Simply put, it’s an outline of all the core components of your course.
- While course maps are typically built leveraging backward design (that is, starting with your learning objectives, then determining assessments and instructional materials), they don’t have to be. Ultimately, what’s most important is that, no matter where you start, the elements of your course map are aligned.
- Aside from being a requirement at some institutions, course maps can serve other helpful purposes, such as assisting with project management, compensating for expert blind spot, and more.
References
Ambrose, S. A., Bridges, M. W., DiPietro, M., Lovett, M. C., & Norman, M. K. (2010). How learning works: 7 research-based principles for smart teaching. San Francisco, CA: Jossey-Bass.
Wiggins, G., & McTighe, J. (1998). Understanding by design. Alexandria, VA: Association for Supervision and Curriculum Development.